2024-25 Basketball Seat Selection Process
A step-by-step walk-through of how to select your seats.

A step-by-step walk-through of how to select your seats.
 1. Use your account log in information to log in to your account.
 Once you have logged into your account, a "takeover" page will appear. This "takeover" page will inform you of your upgrade options.
Please Note: There are two "takeover" pages. One if you have an active time (pictured above), and one if you have a time in the future (next slide).

Please Note: There is a countdown clock on both pages. The countdown on the first page reflects how long until the upgrade process is complete. The countdown on the second page reflects how long until your upgrade time starts.
 3. Click the "upgrade now" or the "preview now" buttons to view your eligible upgrade items.
Please Note: After clicking one of these buttons you will be sent to the eligible items page (next slide). The preview will allow you to see all available inventory, but will not allow you to add to your cart. You will need to log out and log back into your account once your time is active in order to have the add to cart function.
 The preview will allow you to see all available inventory, but will not allow you to add to your cart. If you are logged in under the preview now option when your time comes, you will have to log out and log back in to add seats to your cart.
 4a. Click the select button on the seat(s) or deposit(s) that you would like to upgrade.
 After clicking "upgrade seats", the button will have a check mark (pictured above).
Please Note: The number of seats or deposits you choose in this step will be the number of seats you have to select on the map. If you only want to move one block or select one block, only click the select button next to one seat or deposit.
 4b. Once you have selected the number of seats or deposits you want to upgrade, click the "Next" button at the top of the page.
 5. After clicking "Next" you will be brought to an overhead view of the Colonial Life Arena seating map.
 6a. Click the "View Available Sections" button to show a list of available inventory.
After clicking the "view available sections" button the section overview will appear. (see next slide)
 Please Note: Sections with a green dot indicate that there is at least one available seat in that section. Sections that do not have any available seats will not show a green dot.
 6b. You may choose a section by clicking on an available section on the right side of the page, or by hovering over a section and clicking.
Please Note: If you hover over a section with your cursor, you will be given a brief description of that section including the total cost of a seat in that section, and how many available seats are currently in that section.
 7a. After clicking into a section you will see all of the seats in that section. The seats in green are the seats that are currently available and those in grey are not available.
Please Note: The seat(s) you chose on the eligible items page to be upgrade will be yellow on the map and indicate that it is your "current seat".
 7b. Hover over green seats to see the exact location and the cost of that seat.
Please Note: When hovering over a green seat, that seat will temporarily turn blue.
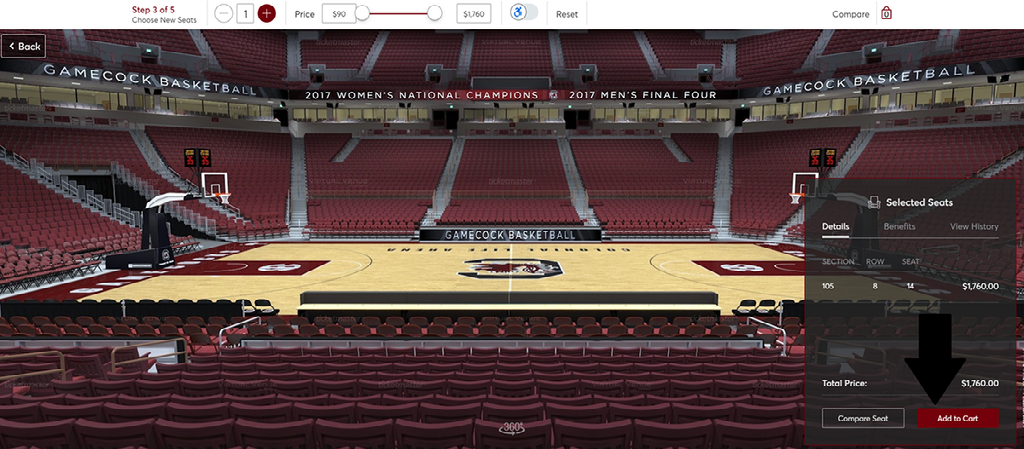 8. Once you have found a seat you would like to select, click on that seat. After clicking the seat it will take you to a view from that seat and an "Add to cart" button will appear on the bottom right side of the page. Click the "Add to cart" button to add this current space to your cart.
Please Note: After adding a seat to the cart, that seat will have a check mark to indicate it is currently in your cart (See next slide). However, this does not mean you have this seat on "hold". Other accounts logged in at the same time will still see this seat as green and can still select it until you complete the checkout process.

Please Note: If you wish to remove the selected seat from your cart, re-click the seat and click the "Remove from cart" button.
 9. Once you have selected all of the seats you want to purchase/upgrade, please click on the cart icon at the top of the page.
 10. After clicking the cart icon a summary window will appear with all of the seats you have selected and added to your cart.
 11. Once you have the correct number of seats in your cart the "continue" button will turn garnet. If you are ready to move forward with selecting these seats click the "continue" button.
Please Note: The number of seats/deposits you selected at the beginning on the eligible items page has to match the same number of seats you added to your cart in order to continue the seat selection process. If you chose to upgrade 4 seats/ deposits at the beginning and only chose 2 seats on the map, like the scenario pictured above, then the "continue" button will be grey and will not let you click it (See Above).
 12. After clicking "CONTINUE" you will be directed out of the virtual venue and to a review page. If everything looks correct on this page click the "Proceed To Checkout" button at the bottom of the page.
Please Note: The above page confirms the seats/ deposits you will be dropping (Current Seats) and the seats you will be obtaining (New Seats). The page also breaks down the cost of your current seats/deposits and how much of a difference there will be for the new seats. The "Total Amount Due" amount will reflect the total cost of the new seats minus any payments you have made.
 13. After clicking "Proceed To Checkout" you will begin the final steps to complete your purchase/upgrade. Step 1 is the delivery option. Click the drop down arrow and select the "Mailed" option. Then click the "Continue" button to the right.
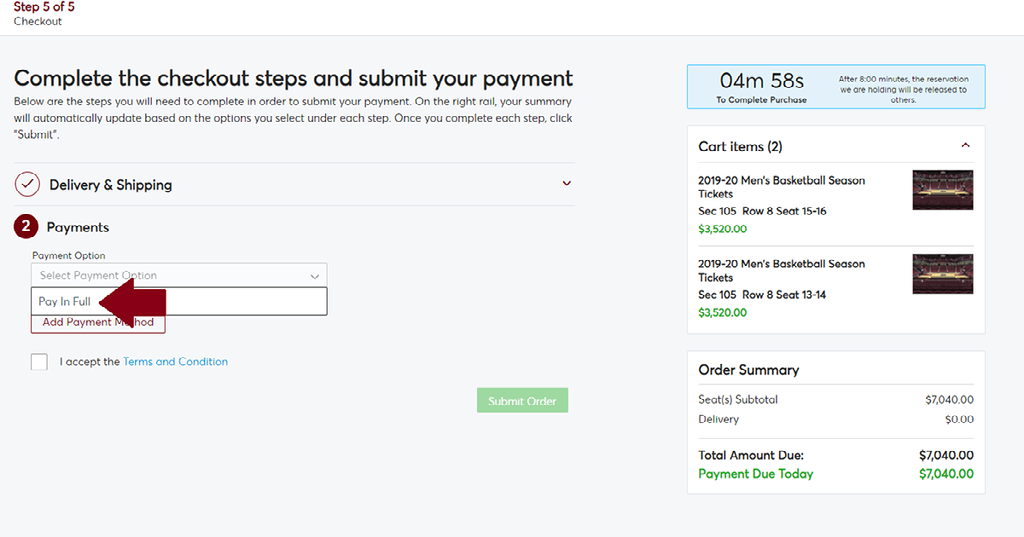 14. Step 2 is the Payment option. If you are NOT enrolled in a payment plan you will only have one option to choose "Pay In Full". Please mark this option and continue.
 Please Note: If you are enrolled in a payment plan you will have two options, "Pay In Full" and "Add to Payment Plan". If you would like to add the difference in price to your plan, choose the payment plan option. (See above)
Please Note: The difference in price will be divided evenly among the remaining months of your plan.
 15. Step 3 is the billing information. Please fill out all of the payment information and click the "Submit Order" button at the bottom of the page.
Please Note: If you selected the payment plan option or if there is a $0.00 balance between your paid deposit and your new seats, the "Amount" will be $0.00. However, you still have to complete the billing information, including typing in a card number. Remember, the name and address on the card must match that of the ones on your account.
 16. Step 4 is the confirmation page. Once you reach this page you have completed the seat selection process.
Please Note: You will also receive an email confirmation of your selection.
If you have any complications or questions, please contact the South Carolina Athletics Ticket Office at 800.4SC.FANS or 803.777.4274.